Showing posts with label easy peasy. Show all posts

Monday, 1 September 2014

The Best Chocolate Frosting you will Ever Taste!

Mrs. Milman's Chocolate Frosting


This is the easiest frosting to make in the history of frostings. It only has 3 ingredients but you have to keep your eye on it for a couple of hours.
It is rich and smooth and is great for a Devil's Food Cake. This recipe was found on this site.

Ingredients:

24 ounces of dark chocolate, or semi-sweet chocolate

4 cups 35% cream
1 tsp light corn syrup

Instructions:
Place chocolate and cream in a large saucepan and heat on low until smooth and a bit thickened. It should take around 20-25 min. Stir constantly with a rubber spatula. 

Then increase the heat to med-low and cook for another 3-4min. This will help thicken the mixture.

Next, pour the chocolate into a large metal bowl and stir in the corn syrup. Chill the frosting for 2 hours and stir every 15-20 minutes. This is very important because this will make the frosting wonderfully smooth, creamy, and even. 

Use the frosting immediately or it will become too hard to spread on your cake. 

Enjoy!

Friday, 30 May 2014

Bacon Jam


This is the most delicious condiment in the world. Sweet and savory it's perfect on bread, with cheese, or just by the spoonfull. 
I found the recipe on a blog.

Ingredients:
  • 3 pounds Bacon
  • 4 whole Large Yellow Onions, Peeled And Thinly Sliced
  • 8 cloves Garlic, Smashed And Peeled
  • 1 cup Cider Vinegar
  • 1 cup Packed Light Brown Sugar
  • 1-½ cup Very Strong Brewed Black Coffee
  • ½ cups Pure Maple Syrup
  • 1 teaspoon Freshly Ground Black Pepper

Cut the bacon slices into 1-inch strips. Add the bacon to a Dutch oven over medium-high heat. Cook the bacon, stirring frequently, until the bacon is browned. Use a slotted spoon to transfer the bacon to a paper-towel lined plate. Drain all but 2 tablespoons of the bacon drippings.


 Place the Dutch oven back over the medium-high heat and add the onions and garlic. Stir well and reduce heat to medium. Continue to cook for about 8 minutes, or until the onions are mostly translucent. 


In a large boil mix the Vinegar, Sugar, Coffee, maple syrup and Pepper. Add the mixture to the onions and reduce heat to low. Bring to a boil and stir frequently. After 2 minutes, add the cooked bacon. 

Simmer uncovered, stirring occasionally to make sure things aren’t sticking, adding 1/4 cup of water if it seems to be drying out. When the onions are meltingly soft and the liquid is thick and syrupy, remove the Dutch oven from the heat and let stand for 5 minutes.


Transfer the contents of the Dutch oven to the work bowl of a food processor that has been fitted with a blade. Fit the lid in place and pulse several times or until the bacon jam is a spreadable consistency. Scrape into a jar (or jars) or a container with a tight fitting lid. Store in the refrigerator for up to one month.
Can be served cold, room temperature or warmed.

Sunday, 6 October 2013

Irish Soda Bread


Soda bread is a bread that doesn't need yeast or time to rise so it's great if you're in a hurry. What makes it rise is the baking soda and the buttermilk. When you mix them together, they start to react and bubble a bit. 
Irish Soda bread is perfect for dunking in soups or stews. Great warm with butter or jam. 

This is a recipe I found on allrecipes.com  and it is very good and simple.

Ingredients:

3 cups all purpose flour
1 Tbsp baking powder
1/3 cup granulated sugar
1 tsp salt
1 tsp baking soda
1 egg, lightly beaten
2 cups buttermilk
1/4 cup melted butter

Directions:

  1. Preheat Oven to 325 F (165 C) and grease a 9x5 inch loaf pan
  2. Combine flour, baking powder, granulated sugar, salt, and baking soda. 
  3. In a separate bowl, mix the egg and buttermilk and add it to the dry ingredients. Mix until just moistened
  4. Add in melted butter and stir
  5. Pour into pan
  6. Bake for 65-70 minutes or until a toothpick inserted into the middle comes out clean.


Sunday, 23 June 2013

Gluten Free!!!

Flourless Chocolate Torte


This chocolate torte is such a delight with its lightness and chocolately-but-not-too-sweet flavour. It is best served with soft whipped cream and berries. Great for people who don't like rich or dense deserts. Very simple recipe and a small amount to ingredients. 

It can be served with a chocolate ganache for the extra sweet-toothed eaters out there but I prefer without. 

Here's how:

Ingredients:


6 large eggs seperated

1 cup unsalted butter, cut into small pieces
9 ounces of semi-sweet or bittersweet chocolate (The best quality you can find)
1 cup granulated sugar
1 tsp pure vanilla extract
1/4 cream of tartar

Steps:
Preheat oven to 350 degrees F

Place rack in middle of oven
Butter a 9x3 inch springform pan, which is this -->

Separate the egg yolks and egg whites in 2 bowls and cover and bring to room temperature.
Melt the Butter and chocolate together in a bowl over a pot of simmering water so you don't burn the chocolate and make it dry and cool to room temperature. (This step is important because later, when you add the eggs, you don't want them to cook in the hot chocolate)

Place the egg yolks in a bowl with 1/2 cup of granulated sugar and beat with an electric mixer until the mixture is until thick and lemon coloured. It will take up to 5 minutes and the mixture will have at least tripled in volume.
Add the vanilla and chocolate mixture and beat until smooth.

In a clean separate bowl, beat the egg whites until foamy and then add 1/4 tsp of cream of tartar. Continue beating until soft peaks form and then add 1/2 cup of granulated sugar. Continue beating until tiff peaks form.
With a spatula, incorporate the egg whites with the chocolate a bit at a time by folding it into the mixture using large strokes. (Don't overmix or the batter will deflate and lose all the lightness and volume)

Poor the batter into the pan and bake for 50-60 minutes, or until toothpick inserted in the middle comes out with a few moist crumbs.
Cool on a cooling rack for 10 minutes, then remove the sides of the pan and cool completely before serving.


When the cake comes out of the oven, it will have risen quite a bit. As it cools, it will sink a bit in the middle but that's normal. It will also have cracks on the top.


Thursday, 25 April 2013

Lemon Meringue Pie


It's been almost a year since my last post but I had a baking bug this week and so I made a Lemon Meringue Pie because it felt like Summer.


I might have already posted a recipe on here but I baked a different one this time. I preferred this recipe by Anna Olson because the flavour of the lemon curd was much less aggressive and thicker. The meringue was also fluffier and the pie itself was much higher and lighter.


For the Pie crust, you can use any pie crust from any recipe including the pre-made frozen ones. Just be sure too cook the crust before you use it. Cook it according to the instructions in the recipe or on the box so until its a nice light golden brown.

Here's the recipe I used and I added 1 tbsp of lemon zest with the lemon juice before adding it to the mix.

Ingredients


Lemon Curd Filling
  • 1 cup sugar
  • 1/4 cup cornstarch
  • 1 cup water
  • 6 large egg yolks
  • 1/2 cup fresh lemon juice
  • 2 tablespoons unsalted butter

Meringue

  • 4 large egg whites, at room temperature
  • 1/2 teaspoon cream of tartar
  • 1/3 cup sugar
  • 3 tablespoons icing sugar, sifted

Directions

Lemon Curd Filling


1.   For the filling, whisk the sugar and cornstarch together in a medium saucepot, then whisk in the cold water. Have the other ingredients measured and nearby. Bring the sugar mixture up to a full simmer over medium-high heat, whisking as it cooks, until the mixture is thick and glossy.
2.   Pour about a cup of this thickened filling into the egg yolks while whisking, then return this to the pot and whisk just one minute more. Whisk in the lemon juice and cook until the filling just returns to a simmer. Remove the pot from the heat and whisk in the butter then immediately pour the hot filling into the cooled pie shell (the filling will seem very fluid, but it will set up once chilled). Cover the surface of the filling with plastic wrap to keep it hot. Immediately prepare the meringue topping.
3.   Whip the egg whites with the cream of tartar on medium speed until foamy, then increase the speed to high and gradually pour in the granulated sugar and icing sugar and continue whipping just until the whites hold a medium peak when the beaters are lifted.

Meringue


1.   Remove the plastic wrap from the hot lemon filling, then dollop half of the meringue directly onto the filling (the filling will still be very soft, so work gently). Be sure to spread the meringue so that it completely covers the lemon filling and connects with the outside crust, then use a bamboo skewer or paring knife to swirl the meringue just a touch (this will secure it to the lemon curd). Dollop the remaining meringue onto the pie and use the back of your spatula to lift up the meringue and creates spikes. Bake the pie for about 20 minutes at 325 F, until the meringue is nicely browned. Cool the meringue completely to room temperature before chilling for at least 4 hours.


Tuesday, 26 June 2012

Triple C Treats

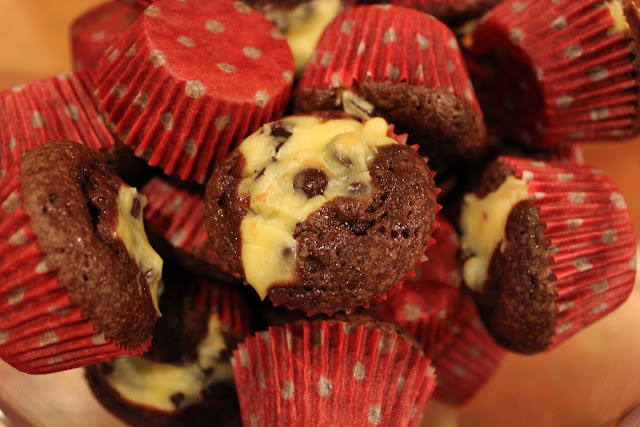
Brownie Cream Cheese mini-Cupcakes

These delectable bites are tiny enough to gulp down in one bite. They're not too sweet and the cream cheese adds a little bit of saltiness so if you like sweet and salty, this is the cupcake for you.

The recipe said it makes 5 dozen but I was only able to squeeze out 4 dozen of these little beauties. 

I found this recipe in a Fine Cooking magazine.

Ingredients:

For Brownies
1/2 cup unsalted butter
4 oz. unsweetened chocolate
4 large eggs, room temperature
1/4 tsp table salt
2 cups granulated sugar
1 tsp pure vanilla extract
1 & 1/4 cups all-purpose flour

Cream Cheese Topping
6 oz cream cheese at room temperature
3 tbsp granulate sugar
1 large egg yolk, room temperature
1/2 cup semi-sweet mini-chocolate chips


Preheat the oven to 350˚F
Line your mini cupcake pans with paper liners


Brownie Batter

Combine the butter and chocolate in a small heatproof bowl. Set the bowl over simmering water or in a microwave and heat, stirring frequently with a rubber spatula, until the butter and chocolate are melted and smooth. Set aside.

With a stand mixer (use the whisk attachment) or a hand mixer, beat the eggs and salt in a large bowl on medium speed until very foamy, about 2 minutes. Continue beating while gradually adding the sugar. Beat until thick and pale, about 3 minutes. With a large rubber spatula, scrape the chocolate mixture into the eggs, add the vanilla, and fold until the two mixtures are just barely incorporated. Add the flour and continue folding until just incorporated. 

Scrape the batter into a 1-gallon heavy-duty zip-top bag. Squeeze out as much air as possible and seal.


Cream Cheese Topping
In a medium bowl, beat the cream cheese and sugar with a wooden spoon until smooth and creamy. Add the egg yolk and mix until blended. Pour in the chips and mix until blended. Scrape into a 1-quart zip-top bag. Squeeze out as much air as possible and seal.

Assemble and Bake

Snip off 1/2 inch from one corner of each bag. Fill each lined muffin cup about two-thirds full with the brownie batter and then top with about 1 tsp. of the cream cheese mixture.

Bake the three trays in the center of the oven until the brownies are puffed and a pick inserted in the brownie comes out just barely clean, about 20 minutes. Let the brownies cool in trays on racks for 5 minutes before carefully lifting the liners out of the tins and transferring them to racks to cool completely. Be sure the tins are completely cool before lining and filling them with the remaining batters.
Store at room temperature or freeze in an airtight container, separating the layers with waxed paper.


Monday, 20 February 2012

Vegetarian pizza

I posted earlier in the year my homemade bacon and pepperoni pizza. Well here's one for the non meat eaters (you know who you are). 

Blue cheese
Pear
Basil


Just brush the pizza dough with a generous coating of olive oil. Then, scatter thin slices of fresh pear and dollops of blue cheese. Sprinkle some fresh basil and finish off with lots of freshly ground pepper (and a pinch of salt). 
You can also add thin slices of red onion if you want. If you slice them thin enough, they caramelize in the oven.


Monday, 16 January 2012

Aren't Thumbs the Best?

Here's a family favorite cookie (especially for the kids) and so easy to make! They also taste scrumptious. If you like mint chocolate, this is going to be a favorite of yours! 

Chocolate-Peppermint Thumbprints:


Ingredients:

For the Cookie:

1 cup + 2-1/2 tbsp flour
1/4 cup cocoa powder
3/4 cup unsalted butter, room temperature
1/2 cup powdered sugar, sifted
1-1/2 tsp pure vanilla extract
1/4 tsp salt

For filling:

4 oz (3/4 cup) chopped semi-sweet chocolate
3 tbsp unsalted butter, cut into 3 pieces
1/4 tsp pure peppermint extract (Although, I added more. Just taste and drop, taste drop)

Make Cookies:


Sift the flour and cocoa together into a medium bowl. 
Mix cream the butter and sugar on medium speed until light and fluffy, about 2 minutes. 
Add the vanilla and salt; continue beating until blended and smooth, about 1 minute more. 
Add the flour-cocoa mixture and mix on low speed until a soft dough forms, about 1 minute. 
Chill the dough in the refrigerator until firm enough to roll into balls, 40 to 60 minutes.

Position a rack in the center of the oven and heat the oven to 350°F. 

Using your palms, roll heaping teaspoonfuls of the dough into 1-inch balls. Arrange them 2 inches apart on the lined sheets. With a lightly floured thumb or index fingertip, press straight down into the middle of each ball almost to the cookie sheet to make a deep well. (Or use the end of a thick-handled wooden spoon.)
Bake one sheet at a time until the tops of the cookies look dry, 8 to 9 minutes. Gently redefine the indentations with the end of a wooden spoon. Let the cookies cool on the sheet for 5 minutes and then let them cool completely on racks.

Make Filling:

Put the chocolate and butter in a heatproof bowl set in a wide skillet of almost simmering water. Stir with a heatproof spatula until almost melted, 2 to 4 minutes. Remove the bowl from the heat and stir until melted and smooth, about 30 seconds more. 
Stir in the mint extract. Let the filling cool, stirring occasionally, until slightly thickened and a bit warmer than room temperature, 30 to 40 minutes.

 Spoon the filling into a small pastry bag with a small plain tip. (Or use a small plastic bag and cut a tiny bit off a bottom corner of the bag.) Pipe the filling into the center of each cookie. Cool completely before serving or storing. The cookies will keep in an airtight container at room temperature for 4 to 5 days.

Saturday, 17 December 2011

Holiday baking! (Part 1)

I've finally finished my last exam before Christmas so naturally I spent the day baking with my family. Here's what we made!


My brothers made our mom's famous Coffee Cake. My mom has made this cake every Christmas for as long as I can remember.


This cake is made with sour cream and lots of butter. It has a toasted walnuts and sugar topping. Cover in icing sugar and it is delicious with a warm cup of coffee. 


I can't give away this recipe since it's a family secret... But here's a different recipe :)


________*__________________*_________________*_________________*_______________*_________            *


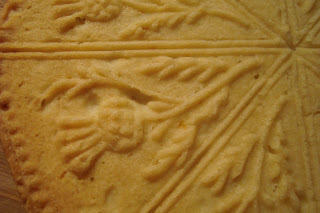
I also made some lemon shortbread. I made it in a traditional ceramic cookie mold. 


You just butter the bottom and flatten your cookie dough making sure it covers all the edges. Bake like a normal pan of shortbread.


Here's what it looks like once it comes out of the oven:


So pretty!! and delicious to boot!


Ingredients:

1 cup cold unsalted butter, cut into 1/2-inch pieces
1/2 cup granulated sugar
1/2 tsp salt
2 tbsp finely grated lemon zest
2-1/4 cups all-purpose flour

Line two baking sheets with parchment. Combine the butter, sugar, and salt in a stand mixer bowl (use the paddle attachment) or a large mixing bowl. Mix on low speed until the butter combines with the sugar but isn't perfectly smooth, 1 to 2 min. Add the flour and lemon zest and mix on low speed, scraping the bowl frequently, until the dough has just about pulled together, about 3 minutes; don't overmix.

Roll: On a lightly floured surface, roll the dough to about 1/4 inch thick. Aim for a uniform thickness to ensure even baking.

Cut: Cut the dough into bars or squares with a sharp knife or, using cookie cutters, cut out shapes as close to one another as possible. Press the scraps together, roll them out, and cut out more cookies. If the dough becomes sticky, refrigerate it briefly. Arrange the cookies on two parchment-lined baking sheets and chill at least 20 min.

Bake: Position oven racks in the upper and lower thirds of the oven and heat the oven to 300°F. Bake the cookies until golden on the bottom and edges and pale to golden on top, 30 minutes to 1 hour. (After 15 min., swap the position of the baking sheets and rotate them 180 degrees for even baking.) If the cookies are done before 30 min., reduce the oven temperature to 275°F for the remaining batches; if they take longer than 1 hour, increase the temperature to 325°F.